Lab 1: The Heart - Anatomy
Preparation for lab
To get the most out of this lab you need to be prepared. The basic knowledge needed for this lab is covered in Amerman “Human Anatomy and Physiology” in Chapter 17.2”Heart Anatomy and Blood Flow Pathway”. PAL (Practice Anatomy Lab) in Mastering also has images of human cadaver hearts, sheep hearts, plastic models, and the 3D interactive models with labels, pronunciations, and descriptions.
Find the bolded terms below in the book and/or PAL. Take a few notes about each structure.
You are expected to be able to:
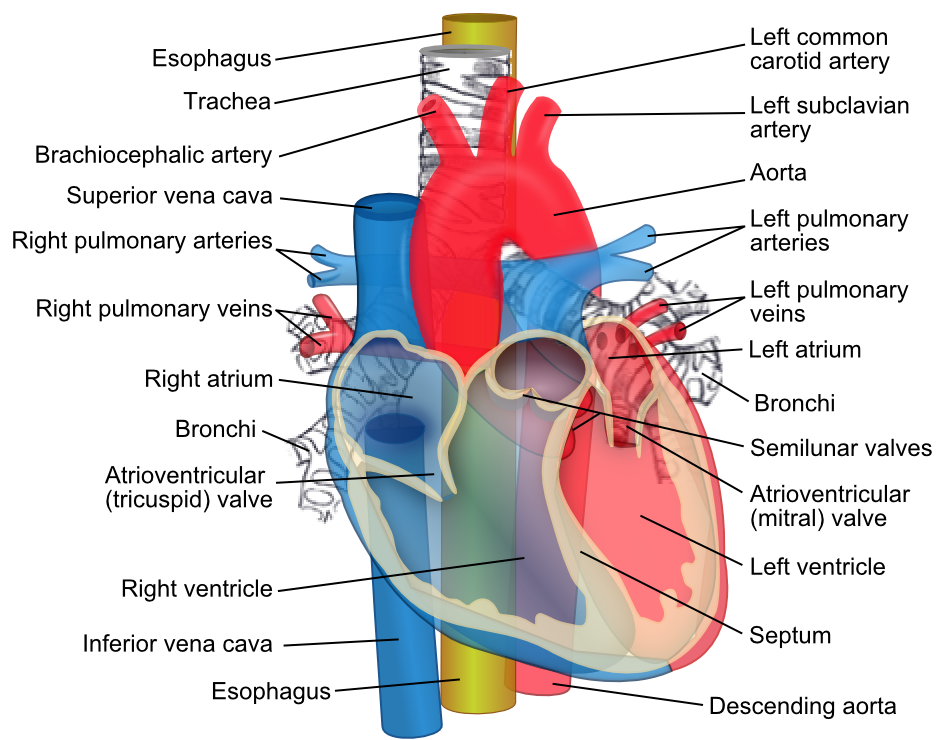
- identify every structure in bold
- describe the function of every structure
- describe the flow of blood through the structures (and other blood vessels in a later lab)
- describe the organs or parts of the body where blood in the structure is flowing to or from
- describe whether the blood in any structure is either fully oxygenated or partly deoxygenated
Safety
You will be dissecting a large preserved animal heart that has been preserved in a fixative to prevent decay and make it easier to separate tissues. While this fixative does not contain formaldehyde, it is still advised to wear gloves and safety glasses - after all, fixatives fix tissues including yours if you are not careful.
Go slowly. You have time. Rushing and very sharp tools do not mix well.
Introduction
The heart has a complex three dimensional structure that is very difficult to learn from a textbook or screen. It is far easier understood while dissecting it. We will be using pig hearts (or if not available, sheep hearts) Take your time dissecting! This lab is designed to leave you time to explore and not to rush you through the material. Compare what you see with your textbook and/or lecture notes. What are all these structures and how might they work? For many this will be the only opportunity in their life to actually see what the text books are trying to describe.
Surface
If the pericardial sac is still intact, use a scalpel to detach the parietal pericardium. Carefully pull a little of the serous membrane from the myocardium and observe. Is there any adipose tissue (fat) visible on the heart surface? If yes, carefully scrape away while paying attention to the coronary blood vessels which supply the heart muscle with nutrients and oxygen. There should be left and right coronary artery and the coronary veins. What happens if one of them gets blocked by a blood clot?
Identify the base and apex of the heart. Identify the auricles - wrinkled pouch-like flaps protruding from the atrial chambers that increase their capacity. Next, identify the pulmonary trunk and the aorta. If the aorta has not been cut too close to the heart, you might see the aortic arch with the brachiocephalic, left carotid, and left subclavian arteries branching off (you will learn these branches in a later lab).
Atria
Cut through the aorta until you see aortic semilunar valve. Right above it you should be able to find the two openings to the coronary arteries; try to put a blunt probe in them! Turn the heart so that you look at its posterior surface (compare to a figure in a textbook if you are not sure what this should look like). There are four pulmonary veins entering the left atrium (on your left!) and the inferior and superior vena cavae entering the right atrium, but depending on where they were cut they might be very short. Where do they come from and what do they transport? Insert a probe in the superior vena cava and through the atrium on into the inferior vena cava. Using scissors, cut parallel to the probe to open up the atrium. Study the tricuspid valve and count the number of valve flaps. Is it the number you expected?
Identify the pulmonary trunk and cut through its anterior wall until you can see the pulmonary semilunar valve.
Continue the cut through the pulmonary trunk into the right ventricle. Then cut down, around, and up through the tricuspid valve to make the cut continuous with the cut you made across the right atrium. You should be able to spread the right atrium open to see a small opening just below the opening of the inferior vena cava: this is the coronary sinus which returns the venous coronary blood. Nearby in the interatrial septum is a depression (or thin spot). The is called the fossa ovale, which is the remnant of the foramen ovale, an opening that passed blood from the right to the left atrium in the fetal heart.
Ventricles
Now examine the opened right ventricular chamber. Observe the fibrous chordae tendineae that attach on the ventricular side of the tricuspid valve. What do you think their function is? Try to move the valve flaps - how far can you move them in which direction?
Follow a chord down to where it’s anchored in the muscle to find a papillary muscle. Notice that the inner wall of the ventricle is not smooth; the muscle has ridges called trabeculae carneae.
Continue your cut through the interventricular septum, and outer wall of the left atrium and ventricle; the heart should now be cut in half in the frontal plane, separating the anterior from posterior. Compare the thickness of the left and right ventricular myocardium. Why is the wall of the left ventricle so much thicker? Dissect down to the mitral valve and count the number of valve flaps; this valve is also knows as the bicuspid valve. Do pig/sheep heart valves have the same “design” as the human valves shown in the text book? What are other differences?
Now that most of the heart is accessible, trace the blood flow through the heart starting at the vena cava. The heart is typically described as two side-by-side pumps. What are those pumps? Why do you have two pumps on not just one? Why do you need valves? When is the blood in the systemic and when in the pulmonary circuit? Is the blood in each structure oxygenated or deoxygenated. Where is the blood going to, or coming from?
Cleanup
This concludes the ’guided tour’ through the heart, but please feel free to keep exploring to your heart’s content… For cleanup, please place the organic tissue in the provided black plastic bag (they need to be double bagged before they go in the trash!). We may keep some nicely dissected hearts for the lab practical. Add a little powdered soap to your dissection tray, add some water, put your dissection tools in the soapy water, and slosh things around. Rinse everything and place them next to the sink on some paper towel for drying.
Spray your table with EtOH or other cleaner and wipe down with a paper towel.
Don’t forget to wash your hands!
Setup & supplies
For each table
-
pig heart
-
dissection dish
-
dissection tools (scalpel, forceps, scissors, blunt probe)
For the lab
-
black plastic bags for disposal of hearts
-
spray bottle with EtOH to wipe down tables